Working with multiple environments
This document discusses one of the recommended approaches when using multiple environments to ensure safe changes to your production projects, while making sure the latest content changes are maintained on environment promotions.
Reasons for working with multiple environmentsAnchor
Once you launch a Hygraph project into production, you will usually work on continuous improvements of your digital product. In some cases, implementing a new feature means also that you will have to apply changes to your schema, as requirements of the API shape and data will change. But applying such change to your master environment will affect your production websites or apps, which is a risk for your business.
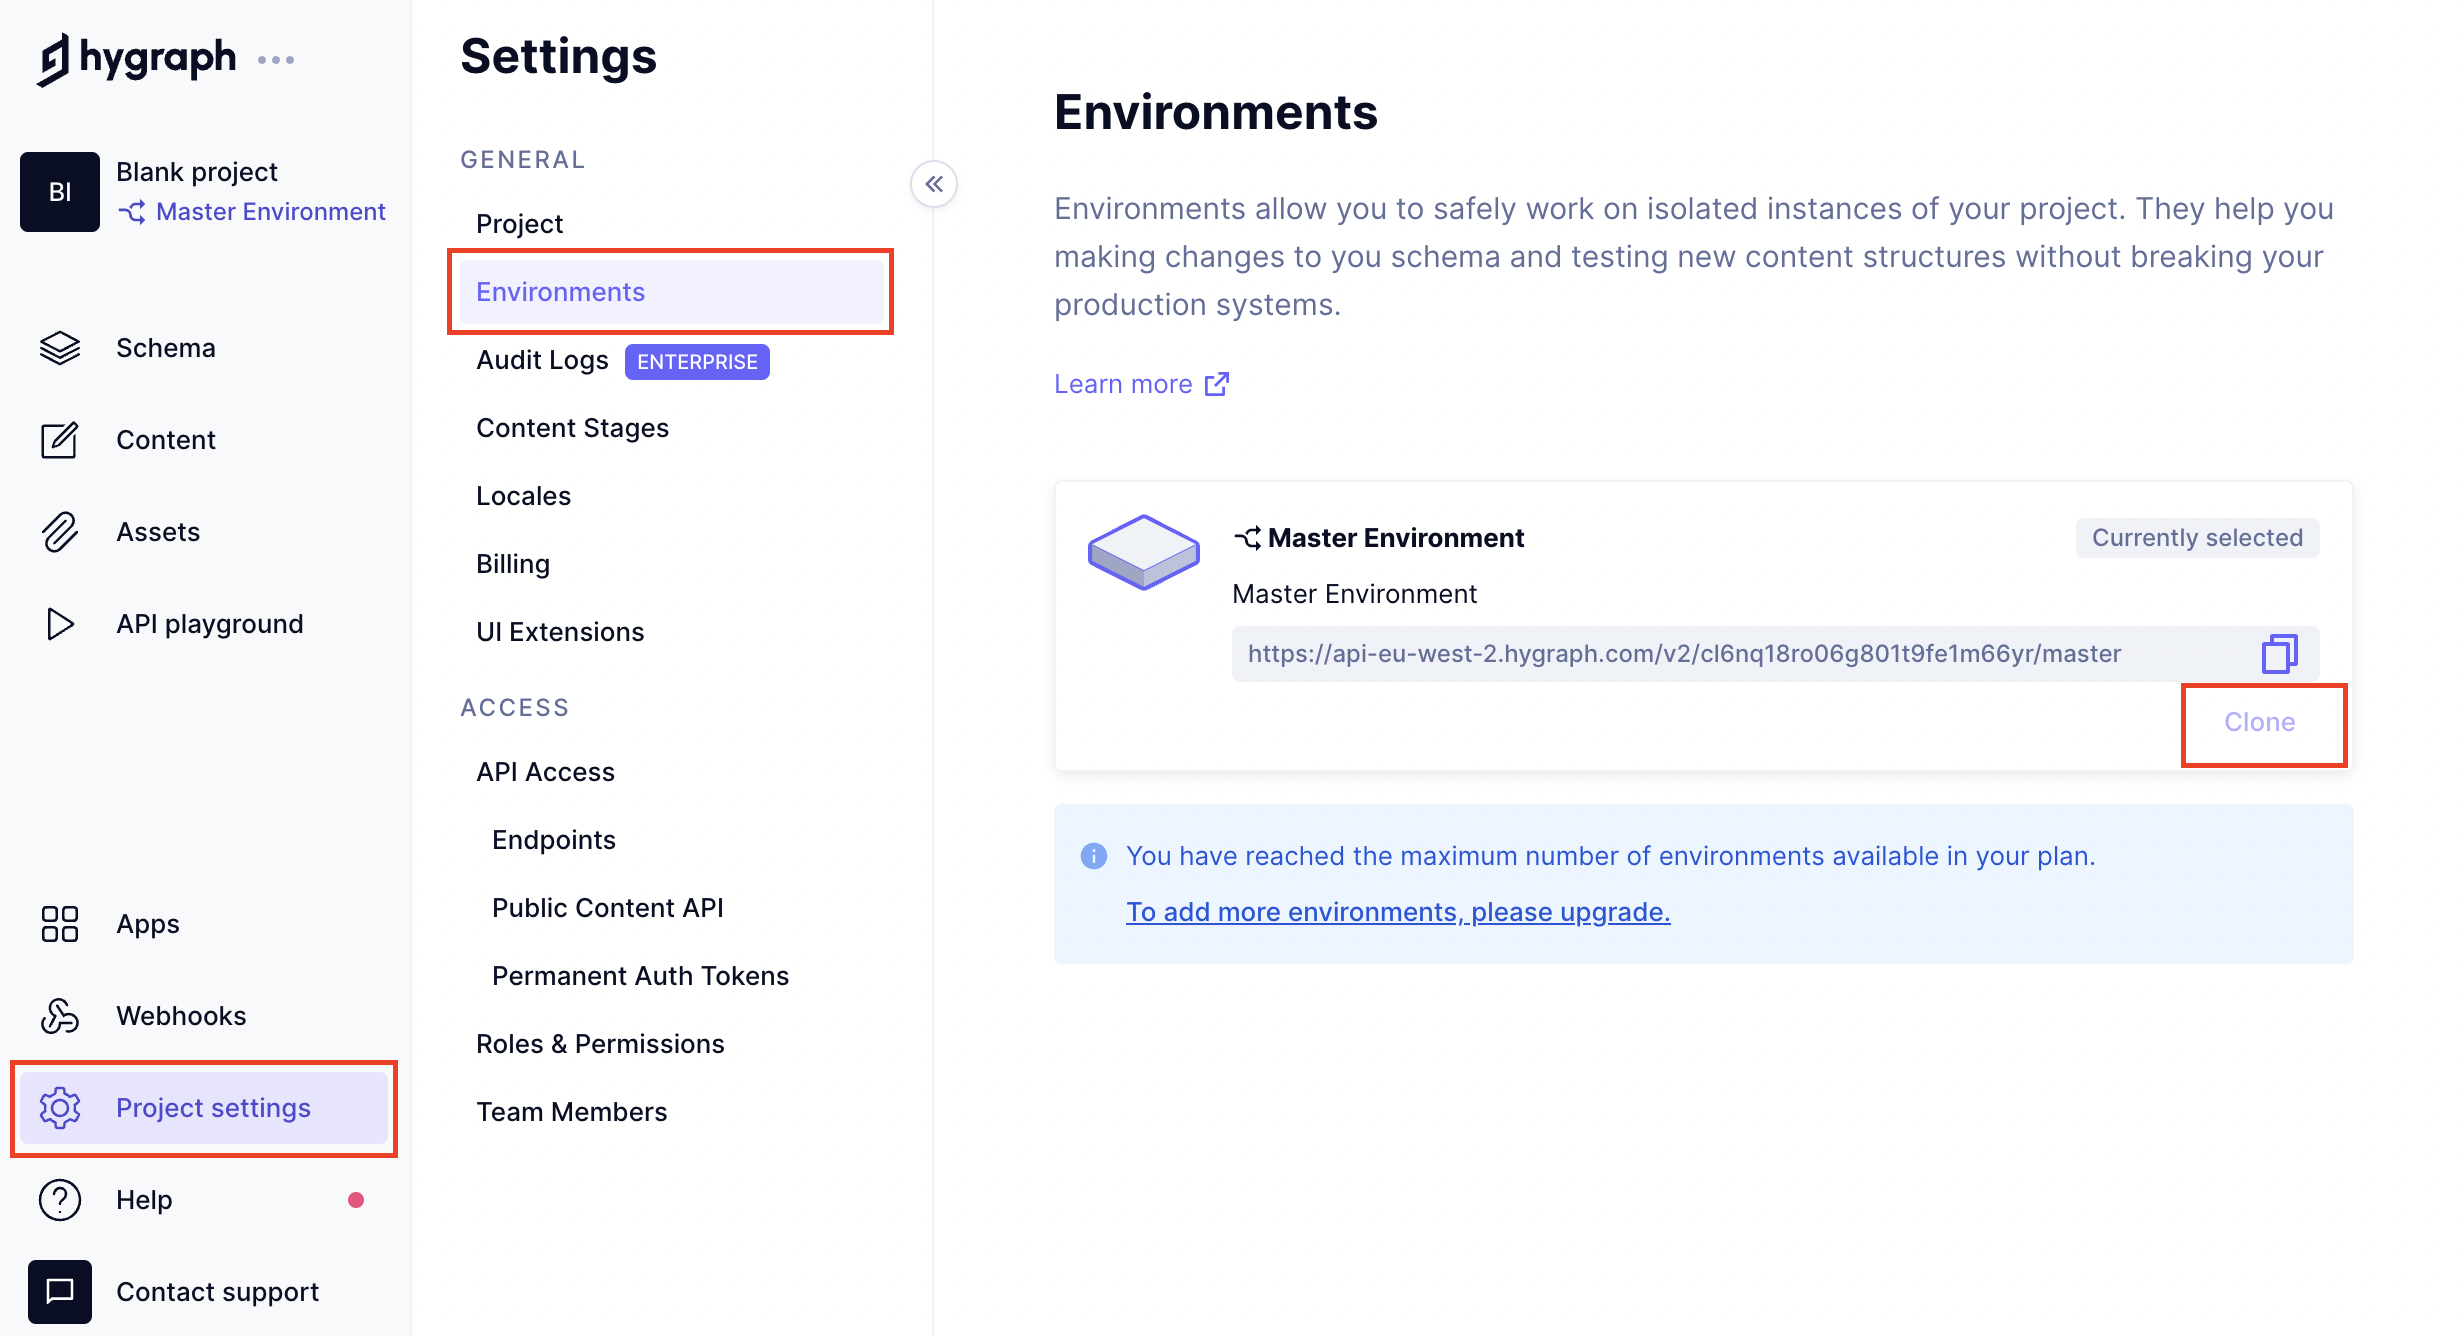
To allow safe iterations on your schema until you develop the final content model for the feature you want to add, Hygraph supports working with multiple environments. Environments are instances of your project. Think of them as copies of your whole project. Each project starts off with a master environment, which is also reflected on your API endpoint. In the following example, we see the endpoint of our master environment:

You can find your master environment API endpoint in Project settings > Access > API Access > Endpoint > Content API.
Setting up a Development EnvironmentAnchor
To spin up a new environment based on your master environment, head over to the Environments tab in your project settings, select the environment you want to clone from, and click the clone button.
In the following example, we name our new environment "Development". As you can see, we get a new API endpoint for this environment that ends with /development.
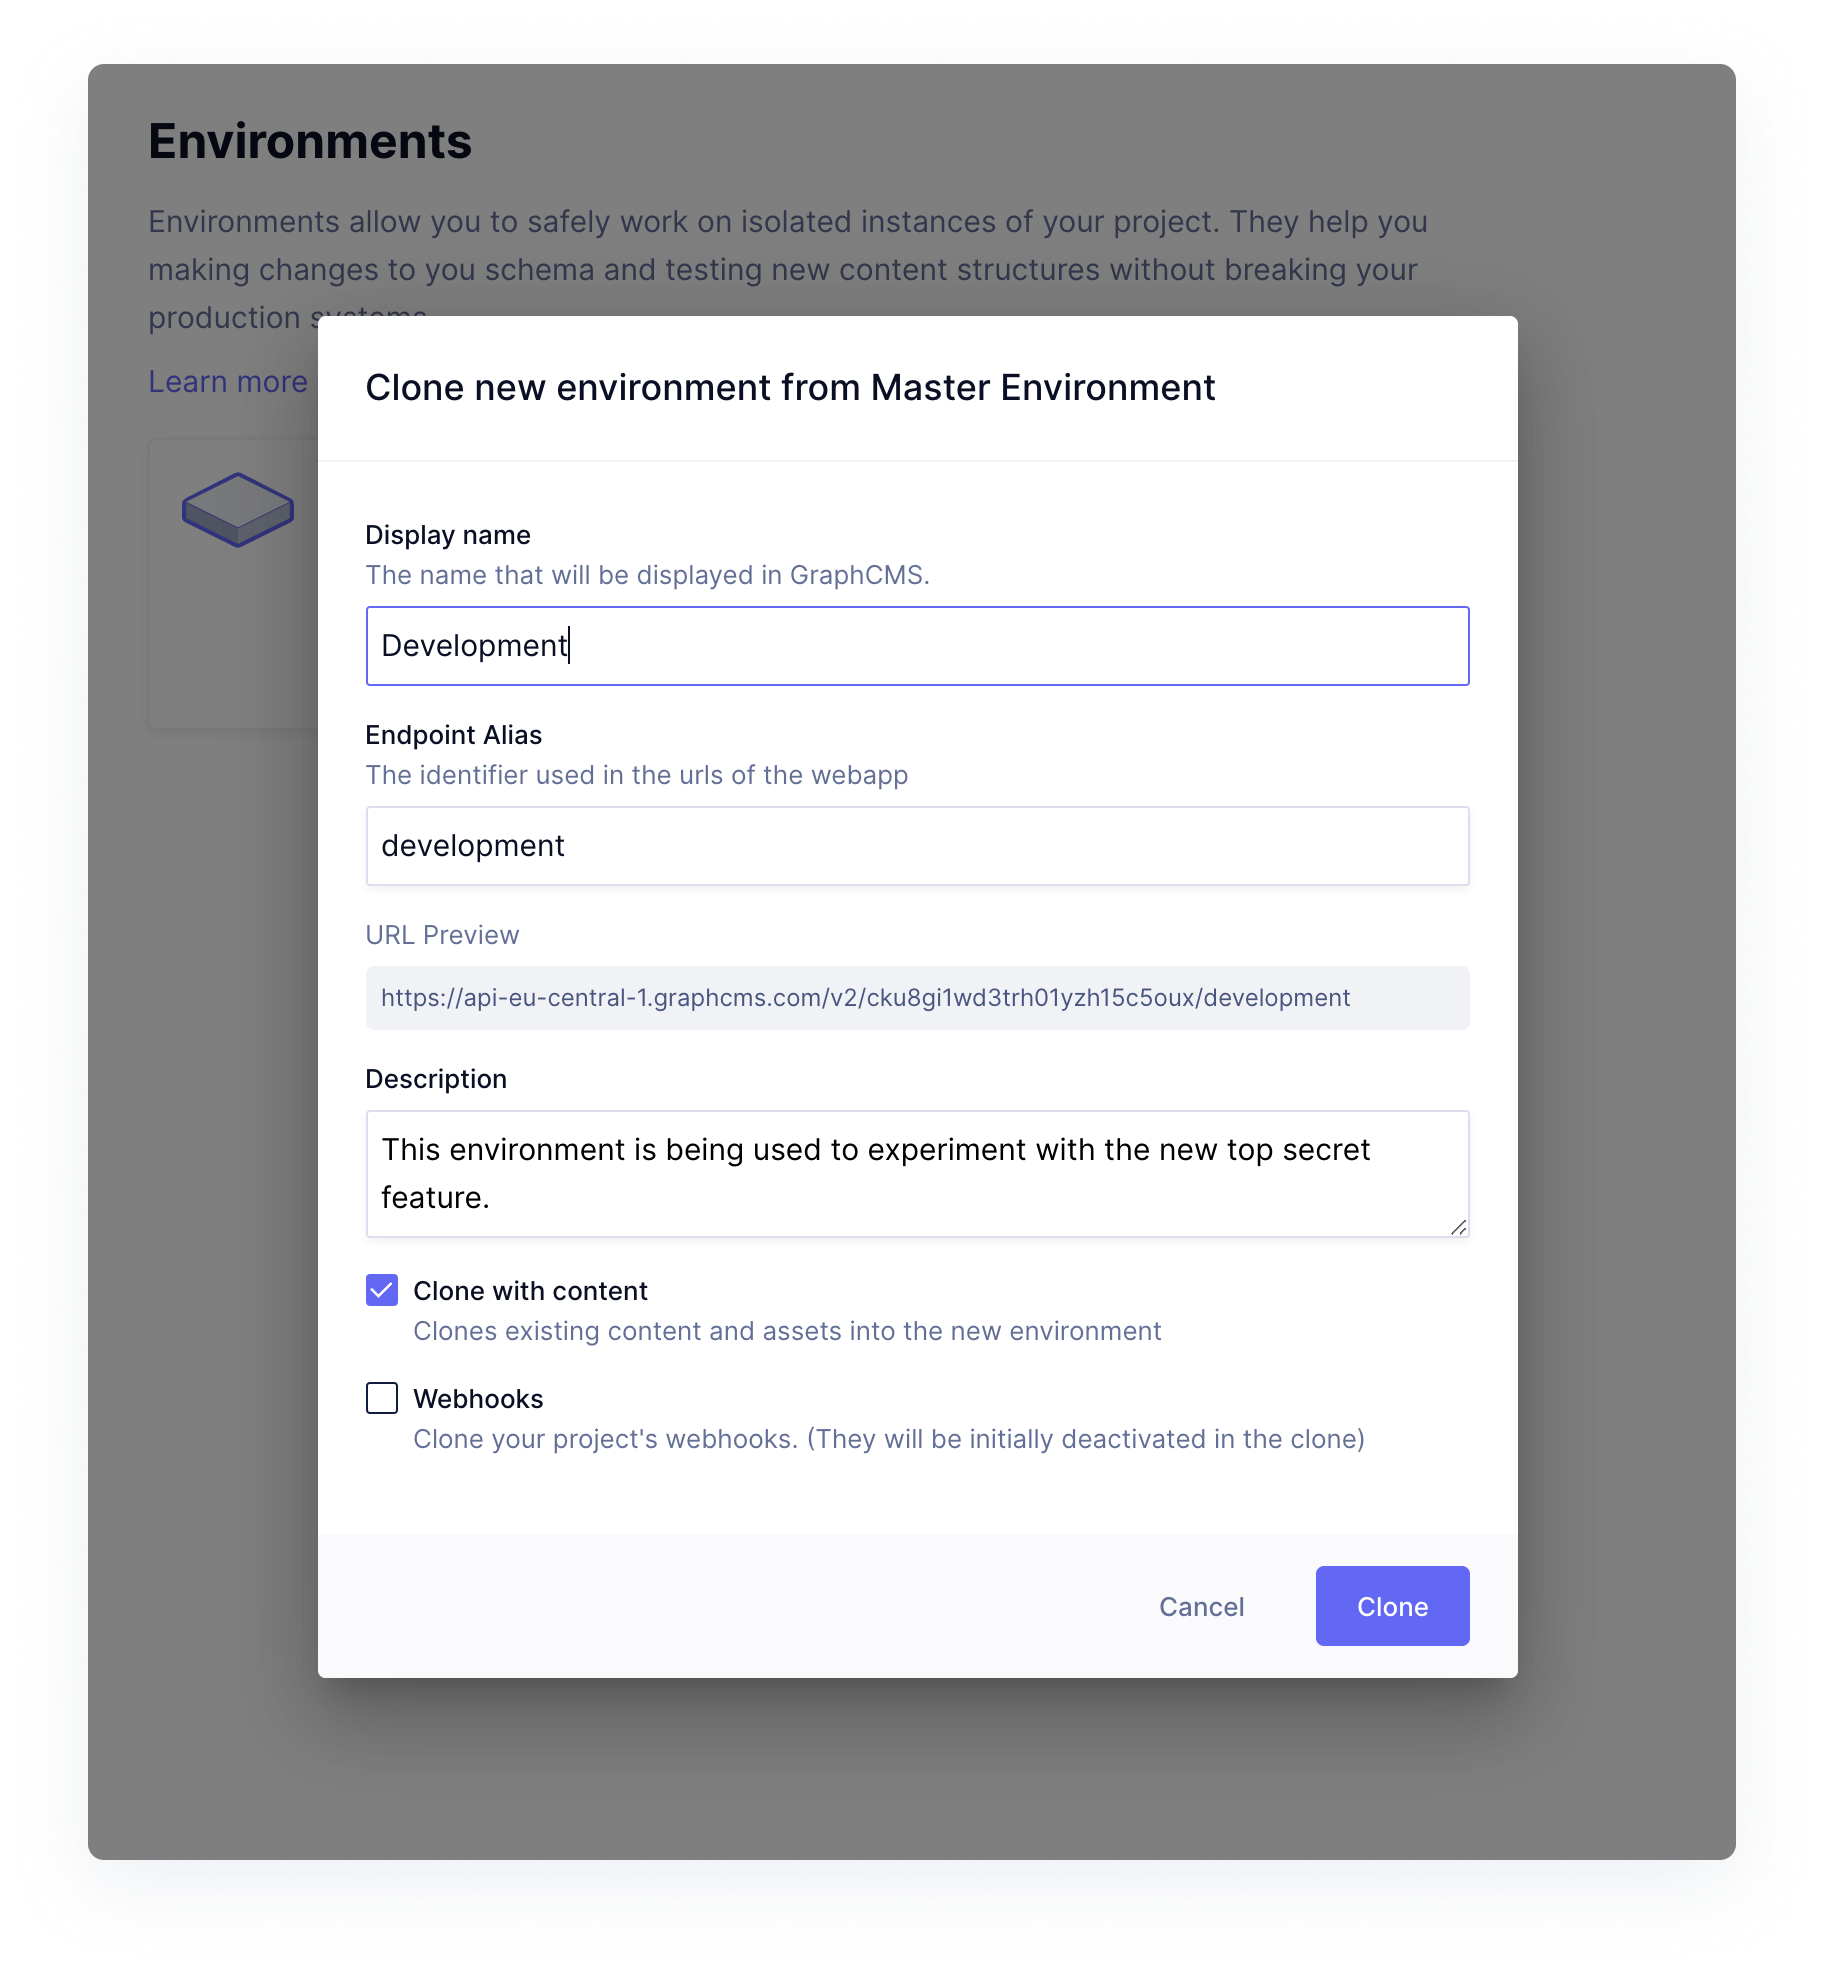
Complete the required information on the screen:
- Provide a
Display namefor the new environment, theEndpoint aliaswill be auto-completed as a result. Optionally, you can provide aDescription. - There are two checkboxes at the bottom of the screen:
Clone with content: if selected, the existing content and assets will be cloned into the new environment. This is recommended if you want to test your development environment with real content.Webhooks: If selected, your project's webhooks will be cloned. Please note that they will be initially deactivated in the cloned environment.
- Click on the
Clonebutton at the bottom of the screen to crate the clone. Cloning may take some time, depending on the size of your project.
Once this is done, you have a clone of your project's master environment to experiment with schema changes without affecting the schema of your production environment.
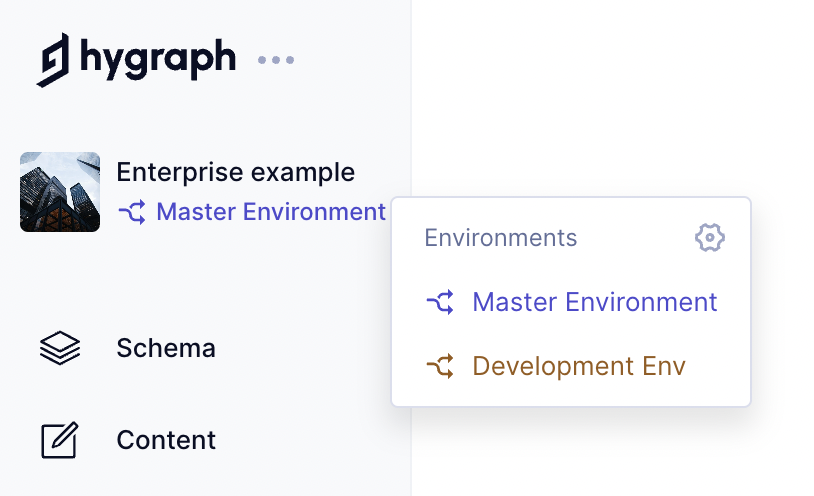
In the CMS interface, environments can be switched with the environment picker next to your project avatar.
Maintaining content changes that happened while in developmentAnchor
Developing a new feature often requires time. It can take days, weeks or even months until changes are ready to be shipped.
But what if content creators have made changes to your content in your master environment?
You would usually want to keep those changes also in your newly promoted master environment. The issue here is that at the time of cloning, those content updates didn't exist, so the content on your cloned development environment is outdated and promoting this environment to master will also mean reverting your content to the time of cloning.
Please note that when we talk about promoting the environment to master, we mean swapping that environment with master so it becomes the new master.
To prevent this and make sure that your work will result in both, the latest schema and the latest content at time of promotion, we recommend using one of the following workflows:
Isolate changes and apply them to productionAnchor
In this scenario, you will be applying a set of changes from your development environment to your master environment using a controlled migration. This workflow requires that you:
- Make your changes and test them.
- Use the Management SDK method to isolate the changes and then apply those changes to production directly.
This method has some limitations when it comes to applying schema changes to your master environment. Access this document for detailed information on this.
This workflow is relatively easy, and generally safe, as running a set of changes as a migration means they will either succeed or fail as a whole instead of individually. This means less risk of ending up in a broken state, because if anything fails in one of the events along the process, everything is rolled back automatically.
This is the workflow you should follow if you're on the Pro plan, as you only get two environments in total, including master.
Please note that, while this workflow is absolutely fine, it doesn't provide a 100% guarantee against encountering issues because you are applying a new schema to updated content.
Working with a third environmentAnchor
This workflow is a little longer, but it is also the safest. It requires for you to do as follows:
- Make your changes and test them.
- Isolate your changes: you can use environment diffing to do this. Alternatively, you may be able to find and isolate the changes because you kept track of them in code.
- Call out a content freeze.
- Clone a third environment: The key to this workflow is working with a third environment that you just clone from
mastershortly before you deploy your new feature into production. Let's call this environmentstaging. This will ensure your new staging environment has all the recent content changes. - Apply the changes you've made to your development environment also to your
stagingenvironment. You can do this using the Management API, as shown here. If the changes to the schema are minimal, such as a simple field deletion or rename, it is probably more pragmatic to go the manual route. - Run tests on your
stagingenvironment to ensure there are no conflicts between the new schema and the updated content. - Promote your new
stagingenvironment to be the new master environment, containing the most recent content and schema changes. See next section for details. - Lift the content freeze.
That's it!
This method has some limitations when it comes to applying schema changes to your master environment. Access this document for detailed information on this.
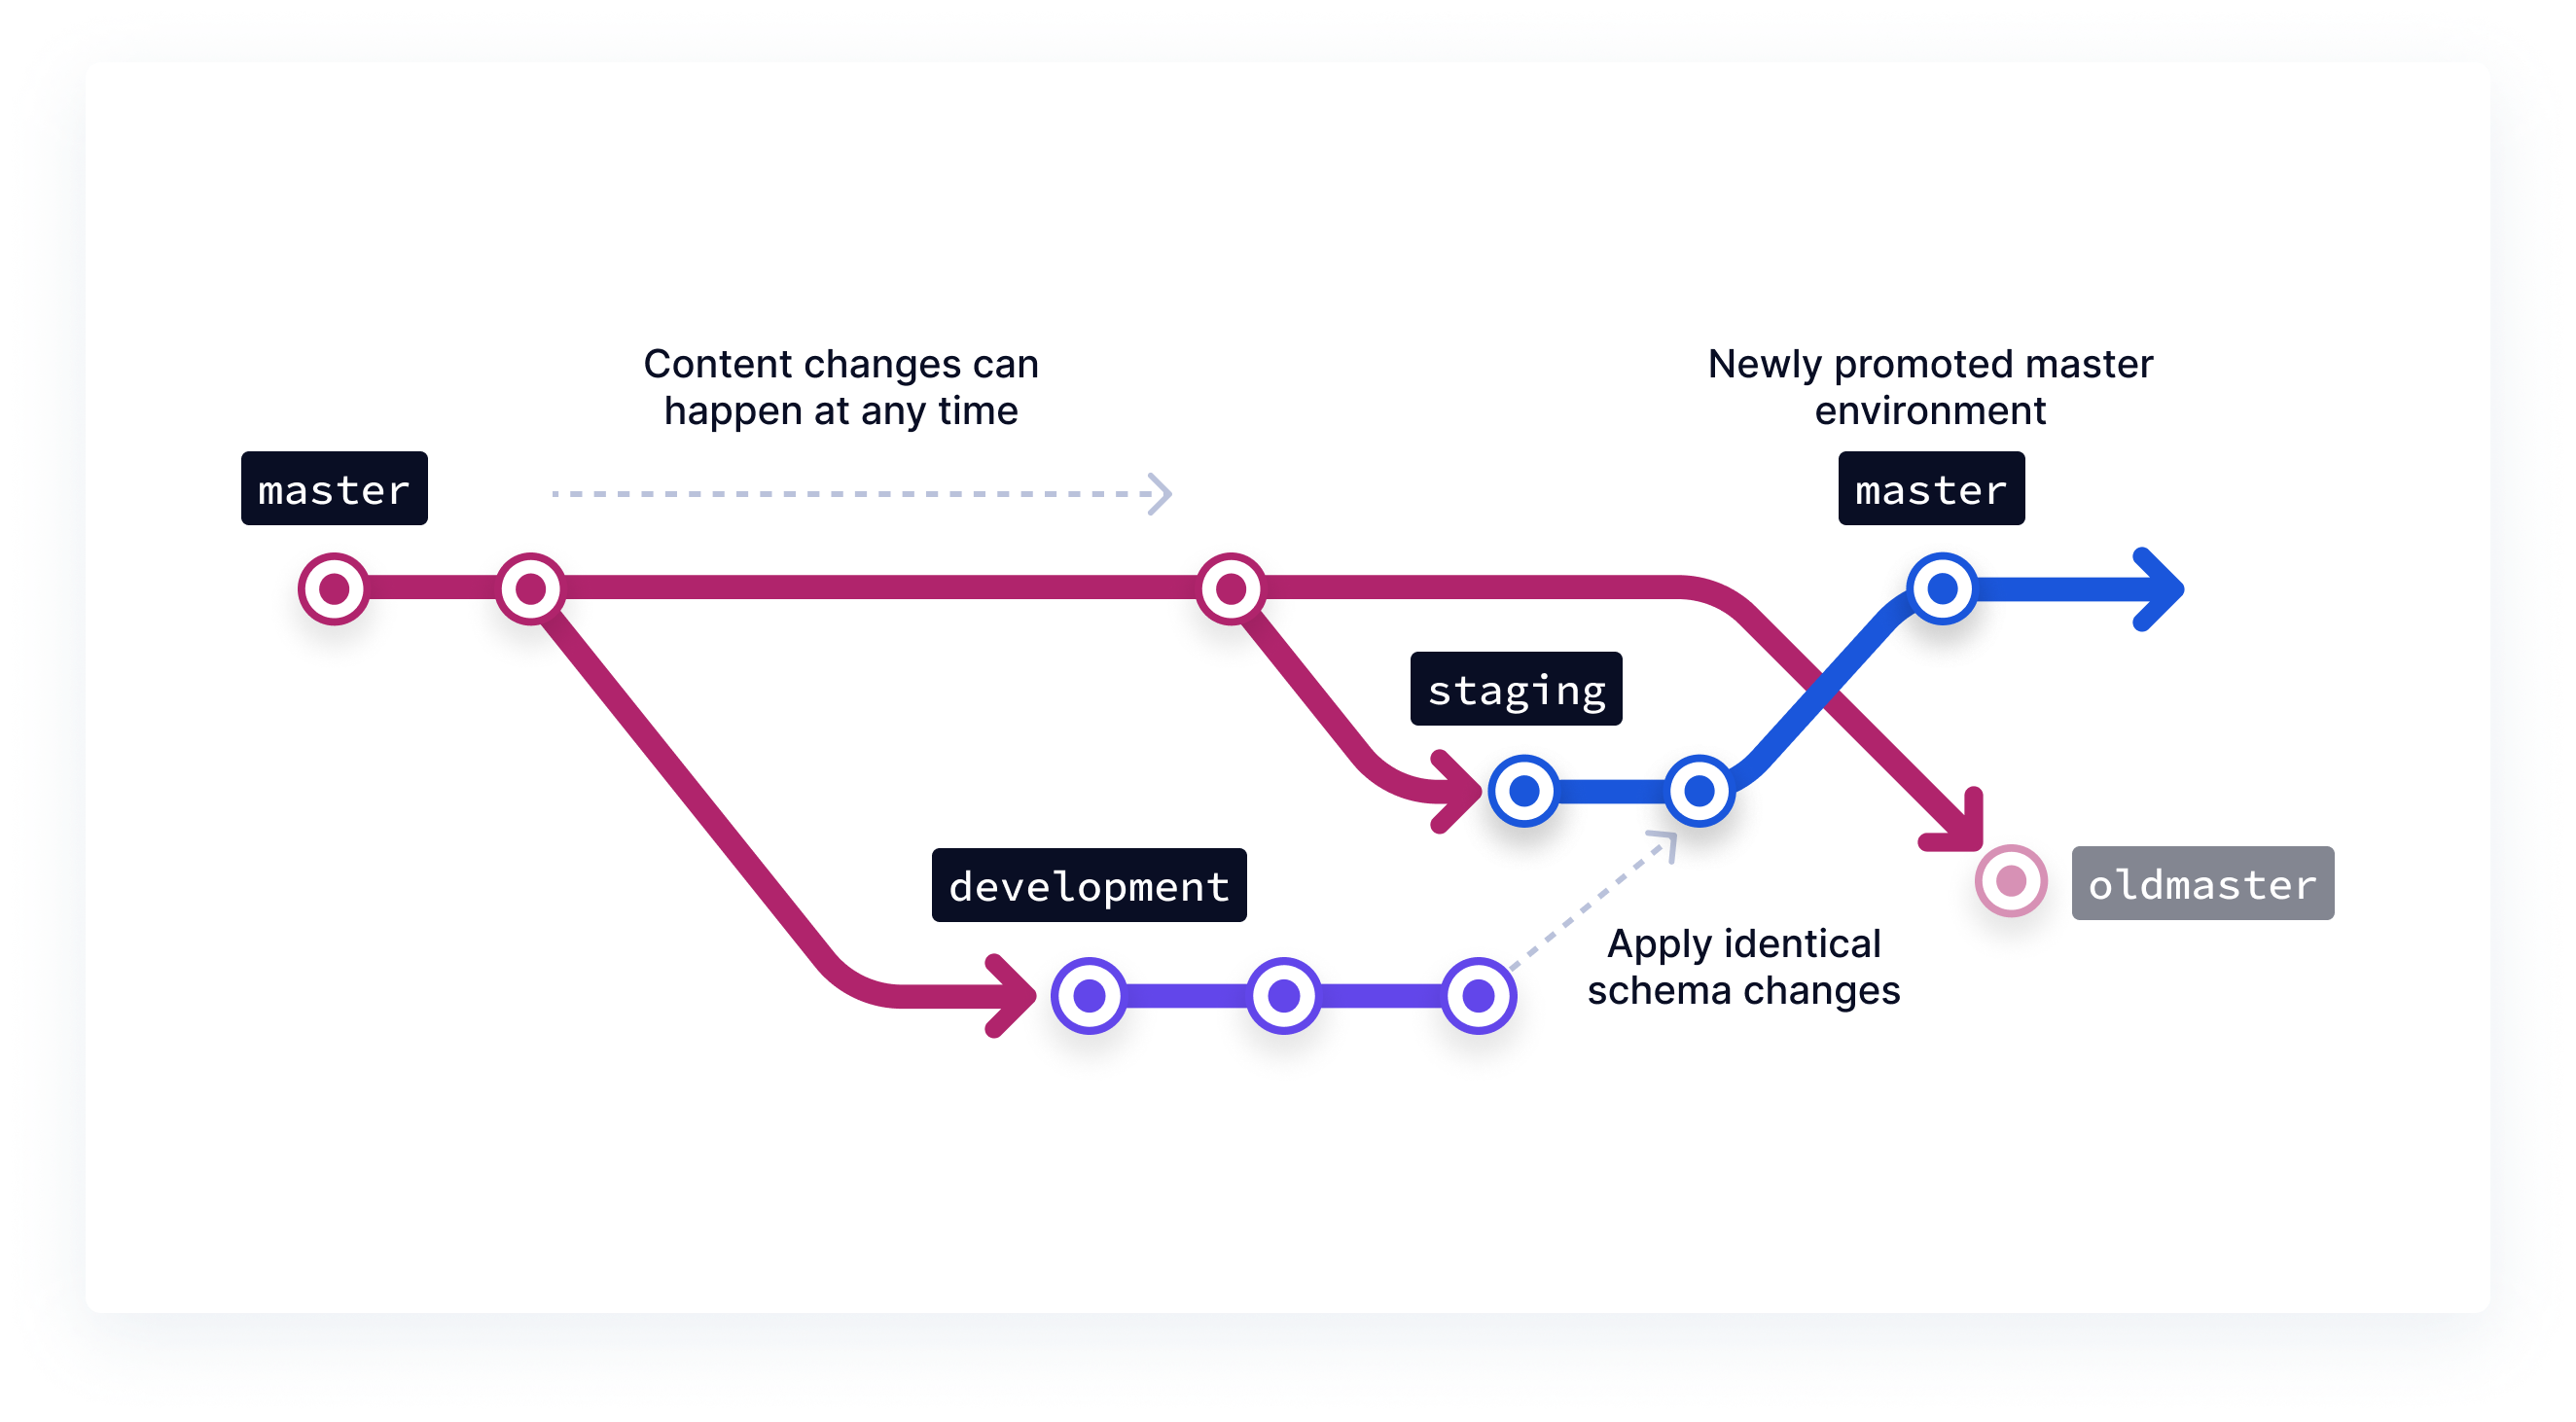
If you are using this method and encounter any issues, it's possible to roll back by re-promoting the old master to be master again. Please note that this may require a roll back on the frontend as well.
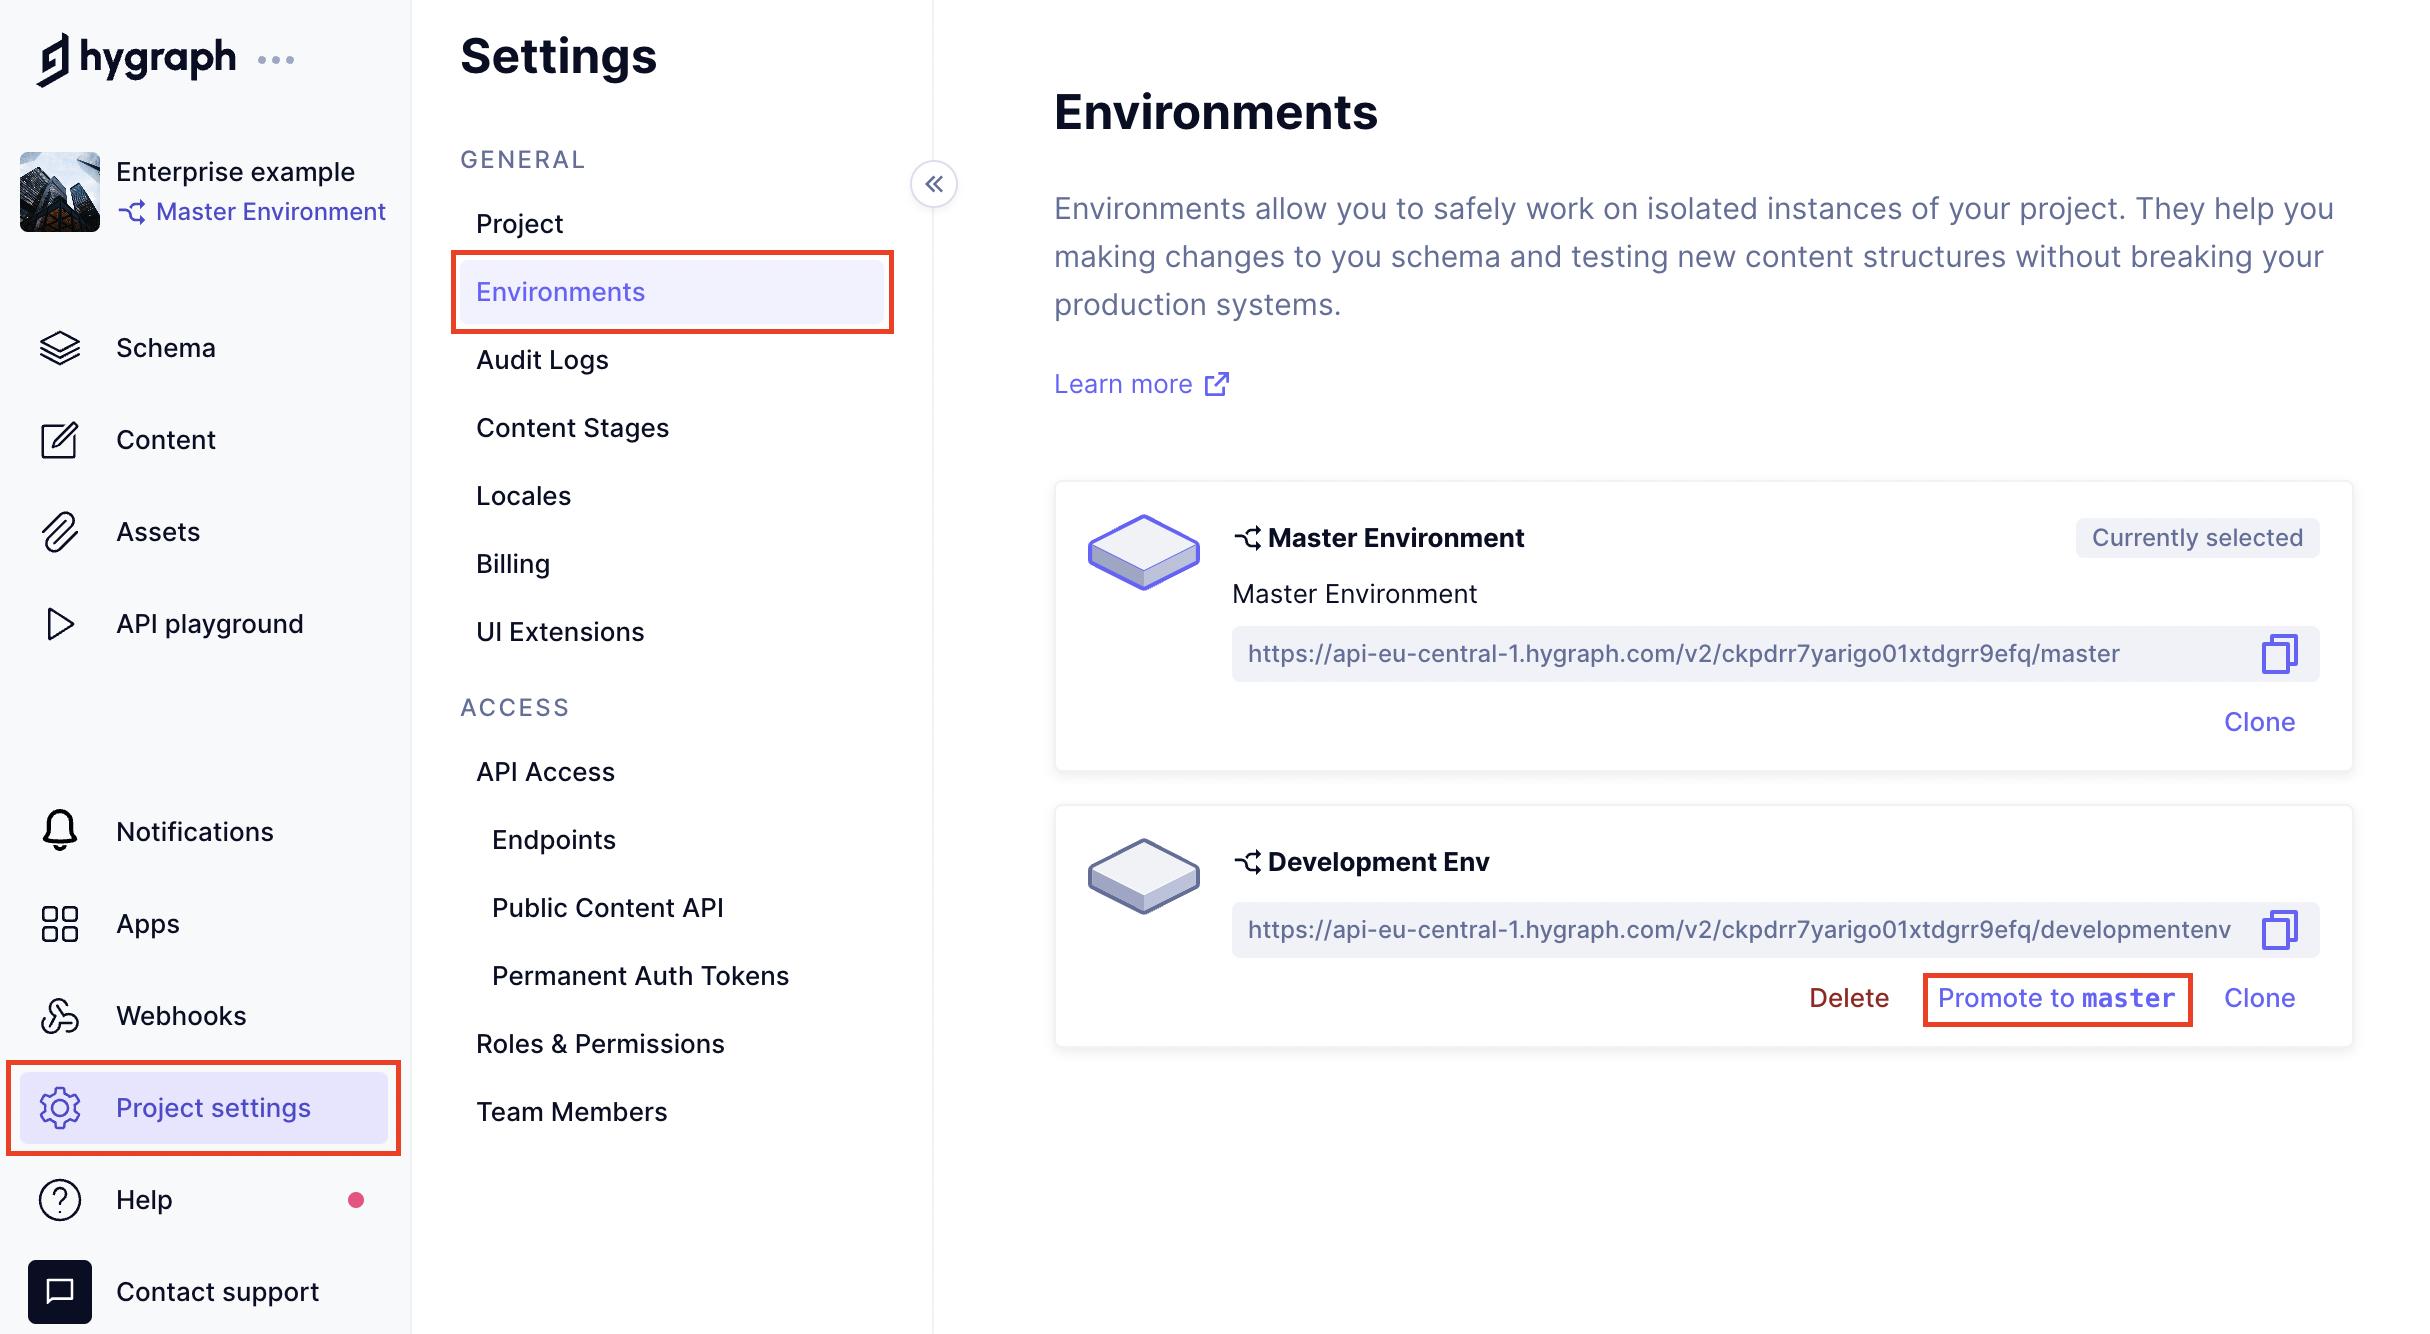
Promoting the Development Environment to MasterAnchor
Once you have made all the necessary changes to your application's code base, simply promote the Development Environment to be the new Master Environment. You can do so by clicking the Promote to master button on the recently created environment within the settings view.
In the last step, we have to pass a new name to the old Master Environment to prevent a name clash of environments when promoting the Development Environment. Completing the New display name field auto-fills New API ID field.
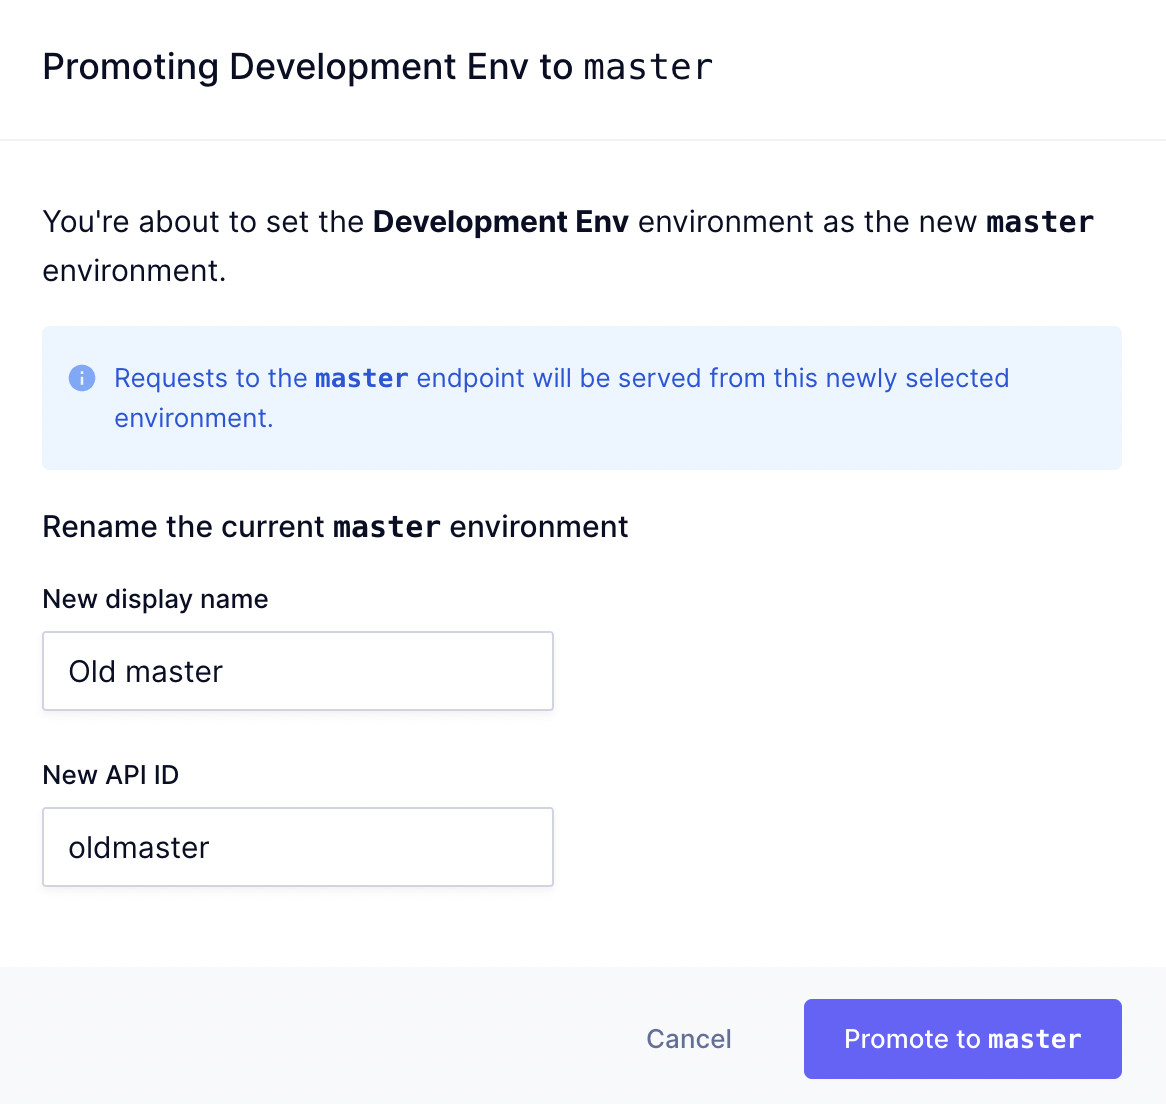
Once you confirm by clicking on the Promote to master button at the bottom of the screen, the Development Environment will be renamed to master and will be your Master Environment from now on.
Following this, deploy your code changes so your production websites or applications are compatible with the newly promoted environment. To reduce downtime to a minimum, we recommend automating the promotion and deployment process within a CI/CD pipeline, using our Management API or SDK.
When deploying changes to production, it's important to coordinate deployment order between your Hygraph project and your frontend application(s). If you are introducing new models/fields, typically you should first deploy the changes in your Hygraph schema and then deploy those changes to the frontend. However, if you're removing models/fields, the order is typically reversed. This prevents issues with data not being available.
ResourcesAnchor
- Management SDK documentation
- Environment diffing documentation
- Documentation on environments
- Jamie's video tutorial
